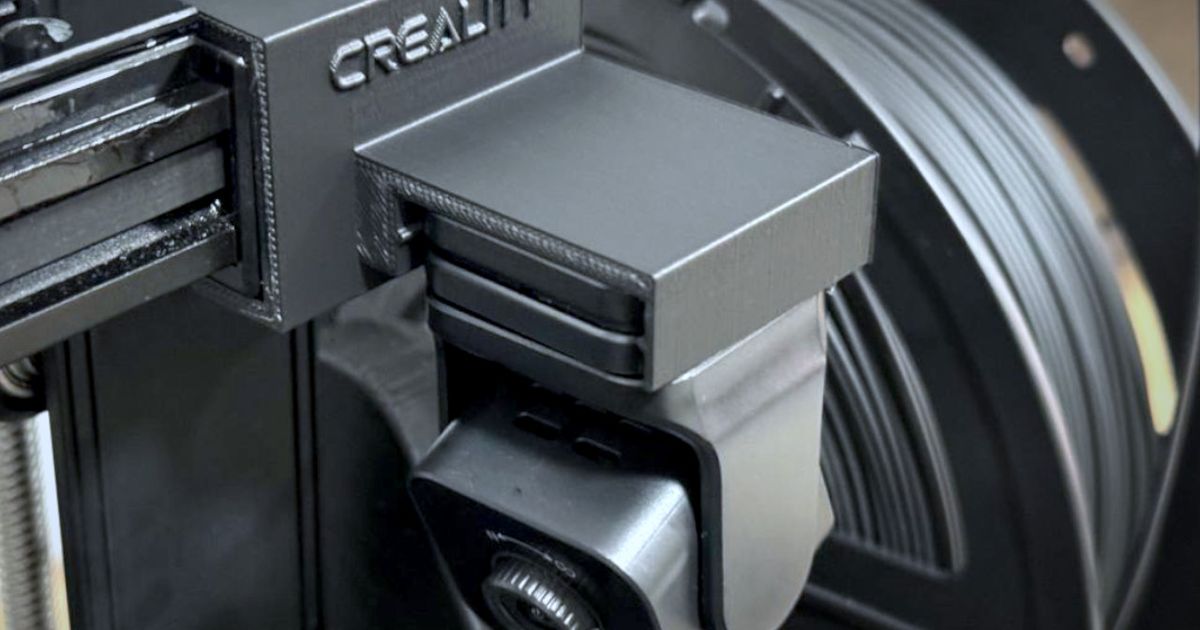
3D printing has become more enjoyable and practical with the addition of Creality’s Nebula camera, which allows users to monitor prints in real time. However, to make the most of this camera, you need a reliable and secure mount that positions it correctly on your printer. If you own a Creality Ender 3 V3 series printer, you might be searching for the best ender 3v3 nebula camera mount stl free files to print your own bracket.
This guide will walk you through everything: from available free STL designs to printing recommendations, installation steps, and even customization tips. Whether you use the V3 KE, V3 SE, or another model in the V3 series, you’ll find a mount that fits your needs.
What is the Nebula Camera and Why Use a Mount?
The Nebula camera is designed to give 3D printing enthusiasts real-time print monitoring through Creality’s smart ecosystem. While the camera itself is compact, it requires a stable mount to secure it onto your Ender 3 V3. A proper mount ensures:
- A clear, unobstructed view of the nozzle and print bed.
- Stability during long prints, preventing shaky or tilted footage.
- Flexible positioning for top-down or side views.
- Easy installation without modifying the printer’s main frame.
That’s why many users search for free STL mounts—they’re customizable, easy to print, and cost nothing.
Free STL Mount Designs for Ender 3 V3 Nebula Camera
There are several community-made STL designs available online for free. Each design serves a slightly different purpose, whether for ease of installation or providing a better viewing angle. Below are the most popular options:
1. X-Axis Snap-On Mount (Ender 3 V3 KE)
One of the most convenient designs is the snap-on X-axis mount. It attaches directly to the belt tensioner on the right side of the printer. The best part is that it doesn’t require screws. Simply slide your Nebula camera into the mount, and it snaps securely into place.
- Compatible with Ender 3 V3 KE.
- Available in two versions: normal and inverse. The inverse design prevents collisions with spool arms or filament holders.
- Quick to install and remove, perfect for those who don’t want permanent modifications.
2. Z-Axis Bolt-On Mount
If you prefer an overhead view, the Z-axis mount is a great option. It replaces or sits alongside the filament runout sensor and requires two M3 bolts.
- Provides a top-down perspective, excellent for tall prints.
- Compatible with most V3 series models.
- Requires some hardware: M3x8mm or M3x25mm bolts.
3. Core XZ Modified Mount
This is a slightly altered version of the Z-axis design with different dimensions. It often requires longer screws but provides a sturdier setup. Users who want to experiment with angles may find this useful.
4. Ender 3 V3 SE Specific Mount
Tailored for the SE model, this mount is designed to fit perfectly without interfering with other printer components. It aligns well with the Nebula camera’s stock dimensions.
5. Official Creality Cloud STL
Creality also offers a generic free STL on their platform. This design works on multiple Ender 3 V3 printers and typically uses two M3x10 screws for installation.
Comparison of Mount Types
Here’s a simple comparison to help you decide which ender 3v3 nebula camera mount stl free file suits you best:
| Mount Type | Compatibility | Hardware Needed | Best Viewing Angle | Difficulty Level |
|---|---|---|---|---|
| X-Axis Snap-On | Ender 3 V3 KE | None (snap fit) | Side/diagonal view | Easy |
| Z-Axis Bolt-On | V3 KE / SE / Plus | 2 × M3 bolts | Top-down overhead | Medium |
| Core XZ Modified | V3 Core variants | Longer screws | Adjustable side | Medium |
| SE-Specific Mount | Ender 3 V3 SE | Stock parameters | Side-on | Easy |
| Creality Cloud STL | Multiple V3 models | 2 × M3x10 bolts | General front view | Easy |
Printing & Slicing Recommendations
When printing your Nebula camera mount, consider the following settings:
- Material: PLA+ is the most commonly used. It offers durability without warping.
- Layer Height: 0.2 mm for a balance of strength and detail.
- Walls/Perimeters: 3 for added rigidity.
- Infill: 15–20% honeycomb or gyroid infill is sufficient.
- Supports: Depending on orientation, minimal supports may be needed.
- Orientation: Print the mount in a way that stress points (like snap clips or bolt holes) are strongest.
After printing, test-fit the camera before final installation. If the fit is too tight, light sanding or filing may help.
Installation Guide
Snap-On Mount Installation:
- Slide the Nebula camera into the mount’s rail slot.
- Snap the mount onto the X-axis belt tensioner.
- Ensure it locks firmly in place.
Z-Axis Bolt-On Installation:
- Remove the filament runout sensor screws.
- Place the Nebula mount in position.
- Insert and tighten M3x8 or M3x25 bolts.
- Adjust the camera angle before use.
SE & Core XZ Mounts:
- Align the mount according to your printer’s structure.
- Use the appropriate screws or clips.
- Insert the camera and ensure stable positioning.
Customization & Troubleshooting
Sometimes you may need to tweak the design:
- Spool interference: Use the inverse snap-on mount to avoid collisions.
- Wobble issues: Increase wall thickness or use stronger infill settings.
- Camera angle: Adjust by re-printing with a modified STL or adding a spacer.
- Loose fit: A drop of double-sided tape can help secure the camera.
Community Insights
Many Ender 3 V3 users share their custom mounts on forums and platforms like Reddit and Printables. Community feedback often suggests that the snap-on X-axis mount is the fastest and easiest solution, while the Z-axis mount gives the most professional view for time-lapse videos.
Conclusion
Finding an ender 3v3 nebula camera mount stl free is easier than ever, thanks to the open-source 3D printing community. Whether you want a quick snap-on design, a bolt-on for stability, or a model-specific mount, there are plenty of free STL files to choose from.
By selecting the right mount, following proper print settings, and carefully installing it, you’ll enhance your Nebula camera experience and keep a closer eye on your prints. Start with the design that matches your Ender 3 V3 model, experiment with orientations, and enjoy high-quality monitoring of your 3D prints.
FAQs
1. Where can I download an Ender 3V3 Nebula Camera Mount STL for free?
You can find free STL files on Printables, Cults3D, and Creality Cloud.
2. Do I need screws to install the mount?
Some mounts, like the snap-on X-axis version, require no screws, while Z-axis mounts need M3 bolts.
3. Which mount gives the best view of the print?
The Z-axis mount provides a clear overhead view, while X-axis mounts show the side of the nozzle.
4. What material should I use to print the mount?
PLA+ is commonly recommended for strength and ease of printing.
5. Can I modify the STL file before printing?
Yes, you can adjust dimensions or angles in software like Fusion 360 or Cura to better fit your setup.


